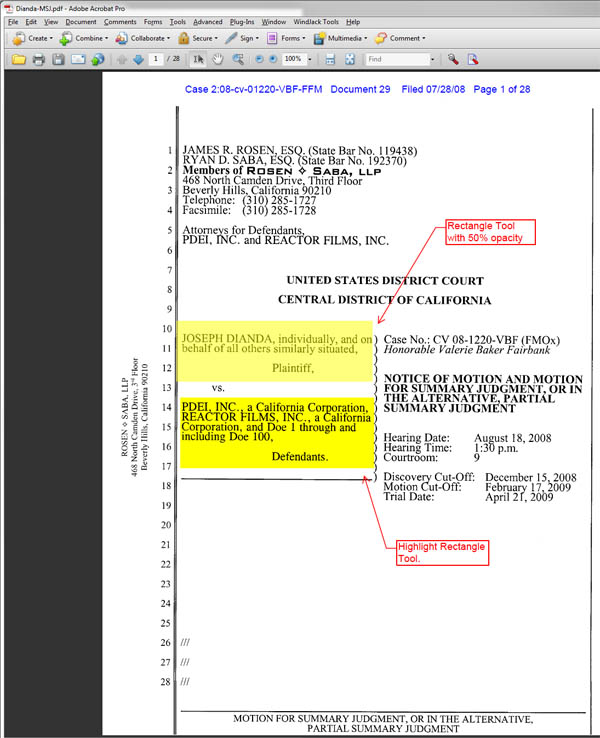
Tools For AttorneysI use a variety of tools in my practice to help streamline the litigation process. Most of them are specific to the way my firm does business, but if there is something of general applicability, I will post it here. The following are the tools currently on this page: Acrobat Exhibit Highlighter Acrobat Exhibit HighlighterThe Acrobat Exhibit Highlighter is a plug-in that you use to highlight rectangles over text or images. Typically, this will be used to highlight a portion of an image exhibit as you can use the text highlight tool in Acrobat to highlight text. However, you may also wish to use it to highlight text to produce a neat rectangle -- this would primarily be used in a trial presentation setting. In any case, simply download the zip file and extract the HighlightRect.api file. Copy that file to your plugins directory. Typically, this is C:\Program Files\Adobe\Acrobat 9.0\Acrobat\plug_ins or C:\Program Files (x86)\Adobe\Acrobat 9.0\Acrobat\plug_ins. You will need administrative privileges to do this. Because the plugin is written in C++, you will need to install the Microsoft Visual C++ 2010 files. If the link to the Microsoft files is broken (these do change over time), simply google "visual c++ 2010 redistributable" and you should be able to locate it fairly easily. You need the x86 version, even if you have a 64-bit system beacause Acrobat and this plugin are 32-bit. Essentially, what the Exhibit Highlighter does is to make a cleaner highlight of a region. For instance, if you are used to using the "Rectangle tool" and setting the opacity to 50%, you have probably noticed that this produces a reduced quality highlight. This tool highlights the region in a much more readable manner and leaves the highlight much brighter. To use the tool, simply select it from the "Tools" menu. Alternately, you can add it to the toolbar for easier access.
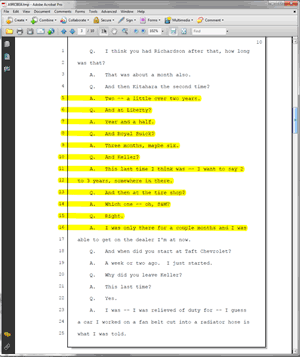
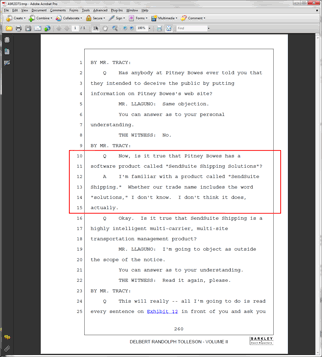
Acrobat Transcript MarkerI have just updated the Transcript Marker, I'll call it Version 2.0. This version adds the ability to "bracket" a transcript, highlight in multiple colors, underline, and markup the transcript in place as opposed to extracting the pages. This last feature is useful if you are working on a motion and want to highlight what the opposing side has cited to but also wish to still have the entire transcript available. August 11, 2010. Another update to Version 2.1. This version adds the "Box" annotation. It simply places a rectangle around the citation. If the citation continues to another page, it will put an open ended incomplete box around the area and place arrows to indicate that the citation continues on the following page. I also added the "Black" color. This is useful for the box annotation. However, if you select it for Highlight, it will be a very light gray. August 28, 2010. Updated to Version 2.2. The tool will now save the parameters that you used, such as Box, Highlight, and the offsets so you don't have to set them each time. Also added "Lines Per Page" to handle 24 line transcripts. I also moved the menu item to the "Edit" menu. September 2, 2010: Updated to Version 2.2.1. Fixed a problem with computing overlapping citations. This fixes a bug where the tool includes additional pages in the markup. October 2, 2010: Updated to Version 2.2.2. Added color to brackets. Fixed issues with non-overlapping citations. Most local rules require that you submit excerpts from a transcript with the relevant portion highlighted. Typically, this is done by having your secretary underline the relevant portions, scanning the marked up document in, and then uploading it. Of course, not only is this time consuming and error prone, but it also creates a very large PDF file. To solve all of these problems, I developed an extension for Adobe Acrobat that will markup the transcript for you. What it does is take a list of deposition citations in the following format P:L-[P:]L. Where P is page and L is Line number. Example: 10:5-12:15 You can overlap the numbers and enter them in any order. It will sort through them and pick the proper pages. It then extracts the pages and highlights the lines that you have referenced. Some sample pages looks like (samples are of "Highlight, "Both" and "Box"):
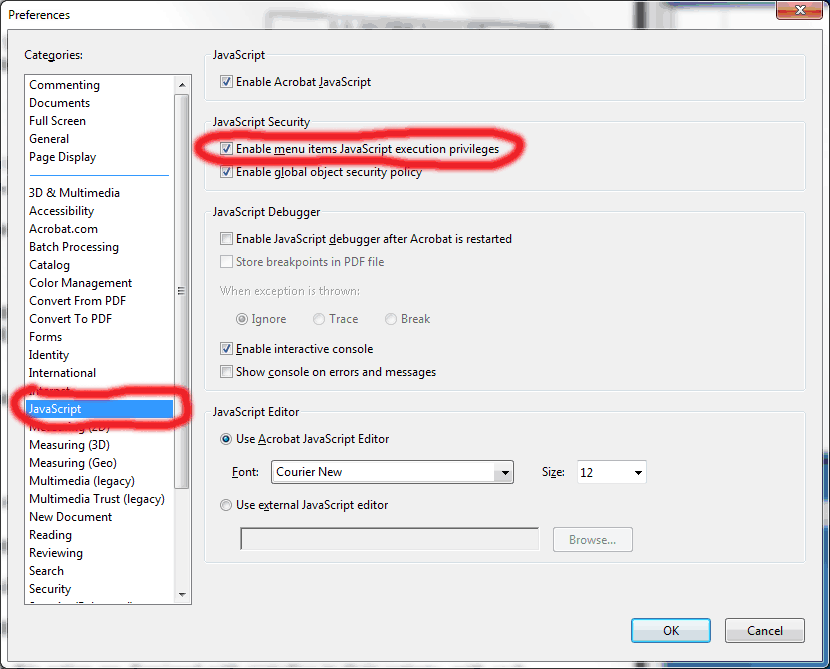
If you are a non-attorney, and you have come to this page, you are likely looking for the part of the program that is used to highlight multiple words and lines in Adobe Acrobat using javascript. Most of the code relates to finding the first word on the page and figuring out which line to highlight. Outside of highlighting deposition transcripts, these functions are not useful. However, the general function used to highlight multiple words is MergeQuads. Actually, MergeQuads only performs the calculation of where to draw the rectangle. See the function HighlightLines for how it is used. The rest of this page is for attorneys or their staff that want to use this tool. If you actually wish to use this tool, you need Adobe Acrobat or Adobe Acrobat Professional. The free reader version will not work. First download the following file: TranscriptMarker.zip. This is a zip file, and you will need to extract the TranscriptMarker.js file into your Adobe Acrobat Javascript directory. Typically, this is C:\Program Files\Adobe\Acrobat 9.0\Acrobat\Javascripts or C:\Program Files (x86)\Adobe\Acrobat 9.0\Acrobat\Javascripts if you are using a 64-bit system. You may need administrative privileges to write into this directory. You can open up the TranscriptMarker.js file and verify that there are no viruses in it -- though this will be difficult for a non-technical person to determine. Also, note that the file is copyright. This program is free to use but you cannot modify, sell, or re-distribute any portion of it.Once you have the file copied to your Javascripts directory, you need to enable Javascript from menu items. This is because the way you call this program is through a new menu item, as will be described shortly. To enable the menus, select Edit | Preferences and set the following preferences. Under the "JavaScript" category, make sure the "Enable menu items JavaScript execution privileges" is checked.
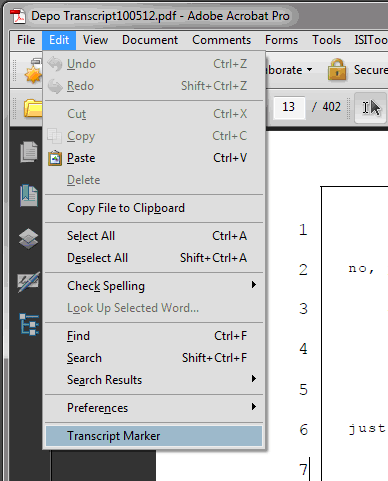
Once that is done, you will likely need to restart Acrobat. Once you have restarted, open up a transcript PDF file. Once it is open, a new menu item should appear under the "Edit" menu (Note: This was moved from the "Document" Menu. If you are using an older version, it sill be under the "Document" menu.). If you click on the "Transcript Marker" menu item, it should launch the program. If the "Transcript Marker" menu item does not appear, try closing down Acrobat and reopening your file. Note that a PDF file must be open for this menu item to show up.
Click on the menu item and the following screen opens:
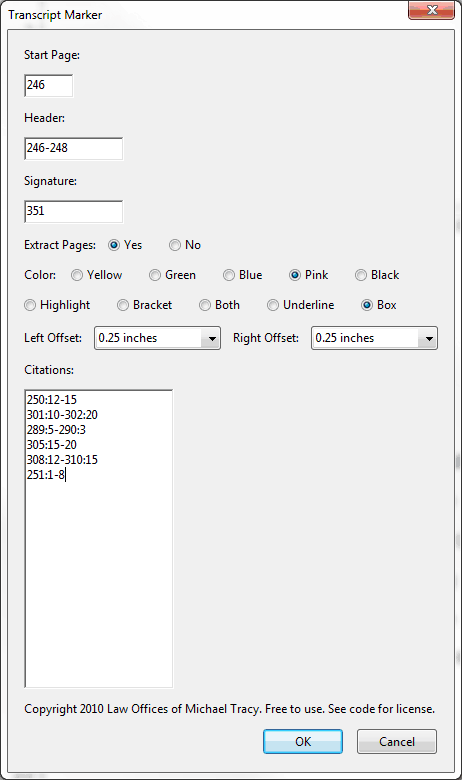
The following are the fields: "Start Page" is the where the transcript starts. Most start on page 1, but some reporters start on page 2. In addition, if you are using the second volume, it might start on a much higher page number. Simply enter the first page number of the transcript you are working on. The "Header" field is the court reporter information and the appearances. Typically, this takes up the first 2 pages, but it might be more. These pages are added to the resulting PDF that will be created. The "Signature" field is used if you have a signature page that you want to insert. Typically, this is the last page of the transcript. However, many reporters send you the signature page separately, so you can leave this blank and then add the signature page in manually. Note that federal courts require the signature page, while many California courts are not as strict. However, it never hurts to include it. The "Color" is the color that will be used to highlight these lines. The "Highlight" will highlight the text only. "Bracket" will place a bracket next to the cited section. This feature is useful if you are printing the transcript out. "Both" does both highlight and bracket. This is the default as I find this the most useful. "Underline" will underline the citation. I generally don't use the underline feature, but some people asked for it. "Box" will place a box around the citation. If the citation continues to the next page, the bottom of the box will be missing and arrows will point to the next page. The "Left Offset" is the distance to the left from the page numbers that the bracket will be displayed. Generally, .25 inches works unless the transcript has timestamps on the left. If it does, use the appropriate distance so that the bracket does not go through the timestamps. This feature only applies to to Brackets and Boxes. It has no affect on underline or highlight. The "Right Offset" is only used for "Box" annotations. It is then the number of inches from the right of the page to end the box. Note that "Right Offset" is from the page boundary and "Left Offset" is from where the line numbers are. The reason for not using the left side of the page for "Left Offset" is that the value would be constantly changing based on different formatting. By using the offset based on the location of the numbers, .25 inches almost always works. The "Citations" are all the citations that you want to include. They do not need to be in order and can overlap. The program will figure out what to do with them. Once you are ready, simply click "OK" and be patient. Note that it takes about 3 seconds per page to format the result. The screen will appear to lock up while it is working. I have tried to put in a progress bar to give a status update, but this does not seem to work. As it is, simply be patient and it will finish. Once it is done, you will need to save the PDF file. As a final note, your PDF file does need to be a "text PDF." That is, you must be able to select text from the document. If your reporter gives the transcript to you in electronic format, this will work. However, if you scan in a transcript, you can OCR the document and it will still work. However, the scan quality needs to be pretty good. That is, if the images are distorted or skewed from your scanner, then it will likely not be able to find the lines. In addition, using scanned transcripts means the size will be much larger. As such, the best method is to use a textual PDF provided by your reporter. If you have any questions, comments, or recommendations for improvement, please let me know. If you have a transcript that it will not mark up, please email me a page from it, and I will take a look at it. I have tried this with all the reporters that I work with and it works fine. However, based on how it locates the positions of the lines, if a transcript is in a different format, it might not work properly. Citation ExtractorHaving a tool that marks up the transcript is useful, but errors can still come up if you forget to type in a reference into the "Citations" box. To solve this problem, I created a Microsoft Word macro that searches your current document (usually your separate statement, but it can be any document) for citations to deposition transcripts. It picks these up because they are prefixed with a "Depo." word. For example Depo. Tracy p.15:5-20:1 The following video shows how to configure and use this tool. You will need the macro source file as well. Follow the instructions in the video to install the macro. That is, you first need to open the text file. Then, copy and paste the macro source code into Microsoft Word as is shown in the video. If you are a non-attorney who has come to this page, you are likely looking for the function in Microsoft Word that highlights a word or phrase. The following is the code: Sub HighlightString(strText As String) LexisNexis Case TitleThis tool is a greasemonkey script for Mozilla Firefox that replaces the tab titles with case names and more user friendly information. It requires Mozilla Firefox as well as greasemonkey. Once you have greasemonkey, you can install the script here. Once installed, your case tabs should look like this:
That is, it replaces your "Search" tab with a "[S]" so that you can read what terms you are searching for. Then, it replaces each tab title with the actual case name as you open them up from your search page. If you have any particular pages that are not showing up correctly, send me the citation and I can look into how to get it to properly display. | |||
Friday, September 23, 2011
Law Offices of Michael Tracy
Law Offices of Michael Tracy: "Tools For Attorneys"


Subscribe to:
Post Comments (Atom)
No comments:
Post a Comment